
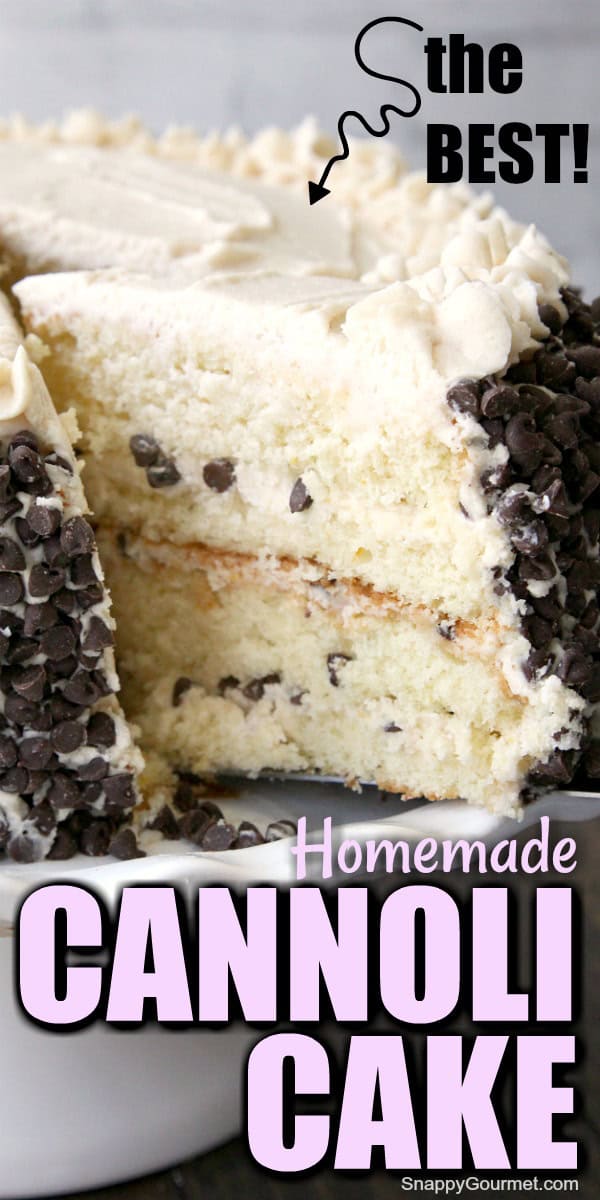
Cannoli Cake is a homemade Italian-inspired layer cake with soft vanilla cake, creamy ricotta and mascarpone cannoli filling, and plenty of mini chocolate chips. This easy from-scratch Cannoli Cake recipe has all the flavors of a classic Italian cannoli and makes a beautiful dessert for birthdays, holidays, and special occasions.

If you love Italian cannoli, you are going to LOVE this homemade Cannoli Cake! Soft, buttery vanilla cake, rich and creamy cannoli filling, a little orange and cinnamon, and LOTS of mini chocolate chips. What’s not to love?!

This homemade Cannoli Cake recipe has all those delicious flavors of a traditional Italian cannoli, but instead of filling individual pastry shells, we’re turning everything into a beautiful four-layer cake. And let me tell you, it’s SO good!
The cake itself is a homemade vanilla cake with a little fresh orange zest. Between the layers and around the outside is a delicious cannoli frosting made with ricotta cheese, mascarpone cheese, powdered sugar, vanilla, orange juice, and cinnamon. Then, of course, there are mini chocolate chips between the layers and all over the outside.
If you’ve been around Snappy Gourmet for a while, you probably already know how much I love cannoli desserts. My Cannoli Cookies, Best Cannoli Dip, and Mini Cannoli Dip Cups are just a few favorites. So making a homemade Cannoli Cake seemed like the next logical thing to do!
This cake looks like something you’d find in an Italian bakery, but you can make it at home with ingredients available at most grocery stores. Now, I wouldn’t say this is the quickest cake in the world. It takes a little time to make the batter, bake the layers, cool everything, prepare the filling, and assemble the cake. But it’s definitely worth the effort!
If you’ve made homemade layer cakes before, you should find the process fairly straightforward. If you’re newer to baking, be sure to read through all my tips before getting started. Especially the frosting tips! The biggest secret to making this Cannoli Cake is using THICK ricotta and mascarpone cheese. You don’t want watery cheeses because the filling needs to be thick enough to stay between the cake layers.
Another thing I love about this cake is that you can make it ahead of time. In fact, I think it tastes even better the next day after the flavors have had time to come together. Perfect for Christmas, Easter, birthdays, anniversaries, dinner parties, or whenever you’re craving a fabulous Italian dessert.
What I Love About This Recipe
- It tastes like an Italian cannoli in cake form. This homemade Cannoli Cake combines soft vanilla-orange cake with a sweet ricotta and mascarpone filling. The cinnamon, orange, and mini chocolate chips give it those familiar cannoli flavors. It’s like getting your favorite Italian bakery dessert in a big, beautiful slice!
- The homemade cannoli frosting is AMAZING. Instead of traditional buttercream, this cake has a creamy filling made with ricotta cheese and mascarpone cheese. It’s rich, smooth, and full of delicious cannoli flavor. The same frosting goes between the layers and around the outside, so you don’t need to make two separate frostings.
- It’s perfect for birthdays and special occasions. Four layers of cake with cannoli cream and chocolate chips make an impressive dessert. You can keep the decorations simple or dress it up with chopped pistachios, chocolate, cherries, or even mini cannoli. It’s a great homemade Italian birthday cake, holiday dessert, or special treat for a dinner party.
- You can customize the flavors. I love the combination of vanilla, orange zest, cinnamon, and chocolate, but you can easily adjust it to your family’s taste. Leave out the orange, try a little almond extract, or add chopped nuts between the layers. There are plenty of ways to make this Cannoli Cake your own!
- It’s a great make-ahead cake. I actually think this cake tastes better the next day! You can assemble it ahead of time, refrigerate it, and have dessert ready for your party or holiday. The chilling time also helps the frosting firm up and makes the cake easier to slice.
What is a Cannoli?
If you haven’t seen my other cannoli recipes and don’t know what a cannoli is, let’s start with that. A cannoli is an Italian pastry that is shaped in a long tube with a filling generally made up of ricotta cheese and powdered sugar.
An Italian cannoli may include other things such as candied fruit, chocolate chips, nuts, cinnamon, mascarpone cheese, or a wide variety of other things.
You can find them at Italian grocery stores and bakeries, as well as many other bakeries and grocery stores now.
If you’re never had one, give them a try! National Cannoli Day is also June 16th, so if nothing else get one to celebrate in June!
Check out my “What is a cannoli?” for more info.

Equipment You May Need
- Two 9-Inch Round Cake Pans – For baking the cake layers. You can also use two 8-inch round pans or pans of other sizes, but the baking time may need to be adjusted
- Electric Mixer – A hand mixer or stand mixer makes preparing the cake batter and cannoli frosting much easier.
- Large Mixing Bowls – You’ll need bowls for the dry ingredients, cake batter, and frosting.
- Whisk – Helps evenly combine the flour, baking powder, and salt.
- Measuring Cups and Spoons – For measuring the cake and frosting ingredients.
- Rubber Spatula – Great for scraping down the mixing bowls and spreading the batter.
- Microplane or Zester – Makes it easy to remove the fresh orange zest without getting the bitter white pith.
- Fine-Mesh Strainer – Helpful for draining excess liquid from the ricotta cheese.
- Cheesecloth – Useful for straining the ricotta overnight if needed.
- Wire Cooling Racks – For cooling the cake layers completely before cutting and frosting.
- Cake Slicer or Long Serrated Knife – Makes it easier to cut each baked cake horizontally into two layers. Or you could bake the cake in 4 pans rather than cutting the cake layers in half.
- Cake Stand or Serving Plate – For assembling and serving the finished cake.
- Offset Spatula – Helps spread the cannoli filling and frosting evenly.
- Parchment Paper – Optional, but parchment rounds can help the cake layers release more easily from the pans.
- Cake Baking Strips – Optional, but they can help cake layers bake more evenly and reduce doming.
- Piping Bag and Decorating Tips – Optional, if you’d like to decorate the cake with extra frosting.
Cannoli Cake Ingredients
This homemade Italian Cannoli Cake recipe has two main groups of ingredients: the cake batter and the cannoli filling and frosting.
Cake Batter Ingredients
- All-Purpose Flour – Regular all-purpose flour is the base of this homemade cake. Be sure to measure carefully because too much flour can make a cake dry or dense.
- Baking Powder – Helps the cake rise and gives it a lighter texture. Make sure your baking powder is fresh.
- Salt – Just a little helps balance the sweetness and bring out the other flavors.
- Unsalted Butter – Use softened butter so it creams properly with the sugar. You want the butter soft enough to mix easily but not melted.
- Granulated Sugar – Sweetens the cake and helps create a light, fluffy texture when beaten with the butter.
- Eggs – Large eggs help give the cake structure and richness. Room-temperature eggs generally mix more easily into the batter.
- Fresh Orange Zest – Adds a subtle citrus flavor that goes beautifully with the cannoli filling. If you don’t like orange, you can leave it out.
- Vanilla Extract – Adds classic vanilla flavor to the cake. You can substitute a little almond extract or Fiori di Sicilia if you’d like a different flavor.
- Milk – Adds moisture and helps create a smooth cake batter. Regular milk works well in this recipe.
Cannoli Filling and Frosting Ingredients
This is the part that really makes the cake taste like cannoli! The filling is similar to a homemade Cannoli Frosting, and you’ll use it between the cake layers and around the outside.
IMPORTANT: Use THICK, full-fat ricotta and mascarpone cheese for the best results! See my post “How to Strain Ricotta Cheese” for full directions and tips.
- Ricotta Cheese – Gives the frosting its classic Italian cannoli flavor. Use whole-milk ricotta and drain it overnight if necessary. The ricotta should be thick, similar to cream cheese, before you make the frosting. Use ricotta impastata if you can find it, but it can be difficult to source.
- Mascarpone Cheese – A rich Italian cream cheese that makes the frosting extra creamy. Mascarpone has a mild flavor and smooth texture. Use full-fat mascarpone and drain any excess liquid if needed.
- Powdered Sugar – Sweetens the filling and gives it a frosting-like consistency. Also called confectioners’ sugar or icing sugar.
- Vanilla Extract – Adds flavor to the creamy cannoli filling. Or you could use almond extract or Fiori di Sicilia Extract which is part citrus and vanilla.
- Fresh Orange Juice – Adds a little citrus flavor that complements the ricotta, mascarpone, and chocolate. You can leave it out if you’re not a fan of orange.
- Ground Cinnamon – Adds a warm, classic cannoli flavor without being overpowering.
- Salt – Helps balance the sweetness of the powdered sugar.
- Mini Chocolate Chips – Sprinkle them between the layers and use the remaining chips to decorate the outside. Mini chocolate chips work especially well because they’re small and easy to distribute. Or use finely chopped chocolate.
How to Make Cannoli Cake:
(Be sure to scroll to the bottom of the post for the complete DETAILED recipe card with the full ingredient list, full directions, and print option)
This homemade Cannoli Cake may look difficult, but the steps are actually pretty straightforward if you have some baking experience. You’ll make the cake batter, bake and cool the layers, prepare the creamy ricotta and mascarpone frosting, and assemble everything with mini chocolate chips.
The most time-consuming parts are waiting for the cakes to cool and assembling the layers. And if your ricotta needs draining, plan ahead and do that the day before.
Step One: Prepare the Oven and Cake Pans
Preheat your oven to 375 degrees F. Butter and flour two 9-inch round cake pans so the cakes release easily after baking. You can also use two 8-inch round pans, but the baking time will be longer. For a little extra insurance against sticking, you can place parchment paper rounds in the bottoms of the pans after preparing them. I also like using cake baking strips around the pans to help the cake layers bake more evenly.
Step Two: Mix the Dry Ingredients
In a medium mixing bowl, whisk together the all-purpose flour, baking powder, and salt until well combined. Set the dry ingredients aside while you prepare the butter and sugar mixture.
Step Three: Cream the Butter and Sugar
In a large mixing bowl, beat the softened butter and granulated sugar with an electric mixer on medium speed until light and fluffy. This may take a few minutes, so don’t rush it! Beat in the eggs one at a time, making sure each egg is mixed in before adding the next. Then beat in the fresh orange zest and 1 1/2 teaspoons vanilla extract until well combined. The orange adds a subtle citrus flavor, but you can leave it out if you prefer.
Step Four: Combine the Wet and Dry Ingredients
Alternate adding the dry ingredients and milk to the butter and sugar mixture, beating after each addition until just combined. Continue until you’ve added all the flour mixture and milk. Be careful not to overmix the batter, which can make the cake tougher or denser. Scrape down the sides of the mixing bowl as needed to make sure everything mixes evenly.

Step Five: Bake the Cake Layers
Divide the cake batter evenly between the two prepared pans and spread it into even layers. I like to use these baking strips to put around the pans. They help make level cake layers. Bake at 375 degrees F for about 20-25 minutes, or until a toothpick inserted into the middle comes out clean. If you’re using 8-inch cake pans instead of 9-inch pans, the baking time will be about 30-35 minutes. Start checking toward the end of the baking time since ovens and pans can vary. You could also bake four individual layers if you prefer and adjust the baking time for the thinner layers.

Step Six: Cool and Cut the Cake Layers
Let the cakes cool slightly in their pans, then carefully remove them and transfer them to wire cooling racks. Allow the cakes to cool completely before cutting or frosting. Once cool, use a long serrated knife to slice each cake horizontally in half, creating four cake layers. If you’d rather make a simpler two-layer cake, you can skip cutting the cakes in half. Just keep in mind that you may not need the full amount of frosting for two layers.

Step Seven: Make the Cannoli Filling and Frosting
In a large mixing bowl, beat the thick, well-drained ricotta and mascarpone cheeses with an electric mixer on medium speed until just combined. Add the powdered sugar, 1 teaspoon vanilla extract, orange juice, cinnamon, and salt. Beat until everything is just combined and smooth. Avoid beating longer than necessary because mascarpone can become softer when overmixed. The frosting should be thick enough to spread without running off the cake layers. If it seems too soft, refrigerate it briefly and make sure the cheeses were properly drained.
Step Eight: Assemble and Decorate the Cannoli Cake
Place one cake layer on a cake stand or serving plate. Spread a thin layer of cannoli frosting over the top, then sprinkle with about 2-3 tablespoons of mini chocolate chips. Repeat with the remaining cake layers, adding frosting and chocolate chips between each layer. Spread the remaining frosting over the top and outside of the cake, then decorate with the remaining mini chocolate chips. Use any extra frosting for piping or decorating if desired. Refrigerate the cake until ready to serve.
(Full printable recipe card with full details is at bottom of post.)
Why Is My Cannoli Frosting Runny?
This is probably the most common issue with homemade cannoli frosting. And the biggest culprit is usually too much moisture in the ricotta or mascarpone. Different brands can vary A LOT. If your cheeses are watery, the frosting may never become thick enough to hold the cake layers properly.
Other possible reasons include a warm kitchen, warm ingredients, or overmixing.
If your frosting seems too soft, try refrigerating it briefly. You can also try adding a little more powdered sugar or additional thick cheese if necessary. Or could also add some homemade whipped cream or defrosted whipped topping.
Unfortunately, if the cheeses were very watery to begin with, adding more sugar may not completely fix the problem. That’s why I recommend starting with thick, well-drained cheeses.

Other Cannoli Cake Decorating Ideas
Want to make your cake look a little more like something from an Italian bakery? Try one or more of these ideas:
- Chocolate Curls – Add shaved or curled chocolate for a more elegant finish.
- Mini Cannoli – Place a few mini cannoli on top right before serving for a fun bakery-style decoration. Add them shortly before serving so the shells stay crisp.
- Maraschino Cherries – Add a few cherries for a colorful, old-fashioned Italian bakery look.
- Chopped Nuts – Pecans, walnuts, or pistachios are all delicious with cannoli cream.
- Orange Zest – A little fresh orange zest on top adds color and hints at the flavor inside.
- Extra Cannoli Frosting – If you make extra frosting, use a piping bag to add simple swirls or borders. If you’re using a piping bag with chocolate chips mixed into the frosting, make sure the opening is large enough for the chips to pass through. Otherwise, they may get stuck!

Cannoli Cake Variations
There are lots of ways to customize this homemade Cannoli Cake recipe.
The original combination of vanilla, orange, cinnamon, mascarpone, ricotta, and chocolate is delicious, but you can experiment with other flavors too.
Chocolate Cannoli Cake: Try using your favorite chocolate cake recipe for the layers instead of the vanilla-orange cake like this one bowl chocolate cake. Chocolate cake with creamy cannoli filling would be delicious!
Chocolate Cannoli Frosting: For a chocolate variation, you could experiment with adding a little unsweetened cocoa powder to the cannoli filling. Start with a small amount and adjust to taste, keeping in mind that the texture may change.
Cannoli Birthday Cake: Decorate the cake with extra mini chocolate chips, sprinkles, chopped pistachios, or birthday candles. You can even top it with mini cannoli for a special celebration.
Orange Cannoli Cake: Keep the orange zest and juice for a subtle citrus flavor, and add a little more to the cake batter and frosting.
Vanilla Cannoli Cake: Leave out the orange zest and juice for a more straightforward vanilla flavor.
Lemon Cannoli Cake: Try substituting a little fresh lemon zest for the orange zest. Lemon and ricotta are a delicious combination!
Almond Cannoli Cake: Substitute a little almond extract for some of the vanilla extract. Almond, chocolate, and cannoli cream taste great together.
Fiori di Sicilia Cannoli Cake: Try Fiori di Sicilia extract for a delicious combination of citrus and vanilla flavors. A little goes a long way, so follow the manufacturer’s recommendations.
Pistachio Cannoli Cake: Add chopped roasted pistachios between the layers or around the outside.
Chocolate Chip Cannoli Cake: Add extra mini chocolate chips to the decorations. You could also experiment with folding mini chocolate chips into the cake batter, although I haven’t tested that change in this particular cake.
Cannoli Cake With Candied Fruit: Add a little finely chopped candied orange peel or other candied fruit to the decorations for a traditional cannoli-inspired touch.
Two-Layer Cannoli Cake: Skip slicing the two baked cakes horizontally. You’ll have a simpler two-layer cake and may not need the full amount of frosting.
Cannoli Cake With Flavored Syrup: For a different flavor, you could lightly brush the cake layers with a small amount of flavored simple syrup before adding the cannoli filling. Just don’t soak the layers too heavily, since the cake already has a creamy filling and too much moisture can make assembly difficult.
I recommend making the original recipe first before experimenting with major changes.

Serving Suggestions
This Cannoli Cake is rich and impressive, so you really don’t need much to serve with it. A thin slice is usually plenty!
- After an Italian Dinner – Serve this cake after your favorite Italian meal for a delicious homemade Italian dessert.
- With Coffee, Espresso, or Cappuccino – Coffee is the perfect pairing for the sweet ricotta filling and chocolate chips.
- For Birthday Parties – Turn this into a special Cannoli Birthday Cake with candles and extra decorations.
- For Christmas – A beautiful addition to an Italian Christmas dessert table.
- For Easter – The ricotta, vanilla, and orange flavors make this a great spring dessert.
- For Anniversaries – A homemade four-layer cake makes any celebration feel special.
- For Dinner Parties – Prepare the cake ahead of time so dessert is ready when your guests arrive.
- With Fresh Berries – Serve with strawberries or raspberries for a colorful presentation.
- With Chopped Pistachios – Sprinkle pistachios over individual slices for extra crunch.
- With Chocolate Shavings – Add a little grated chocolate or chocolate curls for chocolate lovers.
- With Other Cannoli Desserts – Serve alongside my Cannoli Cookies or Mini Cannoli Dip Cups for a fun Italian-inspired dessert spread.

Quick Tips for Best Results
- Drain the ricotta and mascarpone if needed. This is the MOST important tip for thick cannoli frosting. If you’re unsure about your brand, drain it overnight.
- Use full-fat cheeses. Whole-milk ricotta and full-fat mascarpone give the best flavor and frosting consistency.
- Try ricotta impastata. This thicker pastry ricotta is a great option if you can find it.
- Keep the frosting ingredients cool. Warm cheeses can make the frosting too soft.
- Don’t overbeat the cheeses or frosting. Mix just until smooth and combined to help maintain the creamy texture.
- Use softened butter for the cake. Softened butter creams better with the sugar than cold or melted butter.
- Use room-temperature eggs if possible. They generally mix more easily into the cake batter.
- Cream the butter and sugar well. Beat until light and fluffy for a better cake texture.
- Don’t overmix the cake batter. Mix just until the ingredients are combined.
- Measure the flour carefully. Too much flour can make the cake dry or dense.
- Prepare the cake pans well. Butter and flour the pans so the cake layers release easily.
- Try parchment rounds. Parchment paper in the bottoms of the pans can provide extra protection against sticking.
- Use good-quality cake pans. They can help the cake bake more evenly.
- Try cake baking strips. They can help reduce doming and create flatter cake layers.
- Watch the baking time. Nine-inch pans bake for about 20-25 minutes, while 8-inch pans may take about 30-35 minutes.
- Cool the cakes completely. Warm cake layers can soften the cannoli frosting.
- Use a serrated knife. A long serrated knife makes it easier to cut the cakes into four layers.
- Trim uneven cake tops if needed. Level layers make the cake easier to stack.
- Keep the frosting layers relatively thin. The original recipe makes enough for thin filling layers and a thin coating around the outside.
- Try a crumb coat. If the frosting picks up too many crumbs, apply a thin coat and chill briefly before finishing.
- Keep the cake cold while decorating. If the frosting starts getting too soft, refrigerate the cake and frosting for a little while.
- Make extra frosting for elaborate decorations. The original amount may not leave much for piping.
- Use mini chocolate chips. They’re easier to distribute between layers and around the outside.
- Have extra chocolate chips available. You’ll need more if you want to cover the outside generously.
- Add mini cannoli right before serving. This helps the shells stay crisp.
- Customize the orange flavor. Leave out the orange zest and juice if you’re not a fan.
- Try almond extract or Fiori di Sicilia. Both are delicious options for changing the flavor.
- Add nuts if desired. Chopped roasted pistachios, walnuts, or pecans work well.
- Refrigerate before slicing. Chilling helps the filling firm up and makes cleaner slices.
- Make the cake ahead. I think it tastes even better the next day!
- Store the cake covered. An airtight container helps keep the cake from drying out in the refrigerator.
- Freeze unfrosted cake layers if needed. You can prepare the cake layers ahead and freeze them tightly wrapped, then thaw before assembling.

Cannoli Cake FAQ
How should I store Cannoli Cake?
Store the finished Cannoli Cake covered in the refrigerator because the filling and frosting contain ricotta and mascarpone cheese. An airtight cake container works well and helps keep the cake from drying out. Refrigerate leftovers promptly after serving.
Can I freeze Cannoli Cake?
I recommend freezing the unfrosted cake layers rather than the fully assembled cake. Wrap the completely cooled layers tightly in plastic wrap and place them in a freezer-safe bag or container. You can freeze the cake layers for up to 3 months, then thaw before filling and frosting. I don’t recommend freezing the cannoli frosting because ricotta and mascarpone may separate or become watery after thawing.
How long will Cannoli Cake last?
For the best flavor and texture, I recommend enjoying the cake within about 3-4 days when stored properly in the refrigerator. I actually think it’s especially delicious the day after making it! Keep it covered and refrigerated because of the fresh dairy frosting.
Substitutions?
You can substitute thick, full-fat cream cheese for the mascarpone if necessary, although the flavor will be tangier. You can also leave out the orange zest and orange juice if you don’t like citrus. Try almond extract or Fiori di Sicilia instead of some of the vanilla extract. For the chocolate chips, you can use finely chopped chocolate or dark chocolate instead.
Can I use low-fat ingredients?
I don’t recommend low-fat ricotta or mascarpone for this recipe. The frosting needs to be thick enough to hold the cake layers together, and lower-fat cheeses may have a different moisture content and consistency. Full-fat cheeses give the best results. If you experiment with lower-fat ingredients, make sure they’re very thick, but I can’t guarantee the frosting will hold up the same way.
What else can I add to this recipe?
You can add chopped roasted pistachios, pecans, or walnuts between the layers or around the outside. Extra mini chocolate chips, chocolate curls, candied orange peel, or maraschino cherries are also fun additions. For different flavors, try almond extract, Fiori di Sicilia, or a little lemon zest. You can even decorate the top with mini cannoli right before serving!
Can I make this vegan/vegetarian/low carb/gluten-free?
Here are a few ideas, but I haven’t tested these substitutions, so I can’t guarantee the results. Always check ingredient labels if you have dietary restrictions or allergies.
Vegan: This recipe contains butter, eggs, milk, ricotta, and mascarpone, so it would require quite a few substitutions. I’d recommend using a tested vegan cake recipe and a separate dairy-free frosting rather than trying to substitute everything in this version.
Vegetarian: This cake is generally vegetarian, but check the labels on your cheeses and other ingredients if needed.
Low-Carb: This isn’t a low-carb recipe as written because it contains flour, granulated sugar, powdered sugar, and chocolate chips. Major substitutions would be needed.
Gluten-Free: You could experiment with a gluten-free 1:1 baking flour, but I haven’t tested it in this cake. The texture and baking time may vary.
Can I make Cannoli Cake ahead of time?
Absolutely! This is one of my favorite things about the recipe. I think the cake tastes even better the next day after the flavors have had time to come together. Make the cake, assemble it with the cannoli frosting, cover it, and refrigerate until ready to serve.
Why is my Cannoli Cake frosting runny?
The most common reason is excess moisture in the ricotta or mascarpone cheese. Different brands can vary quite a bit, so it’s important to use thick, full-fat cheeses. Drain the ricotta overnight if needed, and make sure both cheeses have a consistency similar to cream cheese before mixing. Warm ingredients or overmixing may also make the frosting too soft.
Can I use cream cheese instead of mascarpone?
Yes! Cream cheese can work as a substitute for mascarpone, but the flavor will be tangier. Mascarpone is richer and milder, so it gives the frosting a more traditional cannoli-inspired flavor. I recommend using mascarpone if possible.
Can I make Cannoli Cake without ricotta?
Ricotta is one of the main ingredients that gives this cake its classic cannoli flavor. You could experiment with a mascarpone or cream cheese frosting instead, but it wouldn’t have quite the same traditional cannoli taste. For the best results, I recommend keeping the ricotta.
Do I have to drain ricotta for Cannoli Cake?
Not always, but I strongly recommend it if you’re unsure about the brand you’re using. Some ricotta cheeses are thick enough straight from the container, while others contain a lot of liquid. The ricotta should be thick like cream cheese before making the frosting. If it seems watery, drain it overnight. You can use ricotta impastata instead, which generally would not require draining but can be difficult to find.
Can I use store-bought cake mix?
You could experiment with a vanilla or yellow cake mix for a shortcut version, but this recipe was developed with homemade cake layers. A cake mix may have a different texture and yield. Follow the directions on the cake mix package and adjust the baking time and assembly as needed.
Can I make this a two-layer Cannoli Cake instead of four layers?
Yes! Just leave the two baked cakes whole instead of slicing them horizontally. You’ll have a simpler two-layer cake. Since there are fewer layers to fill, you may want to reduce the amount of cannoli frosting.
Can I use different cake pans?
Yes! The original recipe uses two 9-inch round cake pans, but you can substitute two 8-inch round pans. The smaller pans will need a longer baking time, about 30-35 minutes instead of 20-25 minutes. Other pan sizes would require additional adjustments.
How do I get smooth frosting on Cannoli Cake?
Use an offset spatula and work with chilled, thick frosting. If you’re getting a lot of crumbs in the frosting, try applying a thin crumb coat and chilling the cake before adding the final layer. You can also make a semi-naked cake with a thin frosting layer for an easier, rustic finish.
Should I serve Cannoli Cake cold or at room temperature?
I recommend serving it chilled or allowing it to sit out briefly before serving if you prefer a slightly softer cake texture. Don’t leave it sitting out for long periods because the frosting contains fresh dairy. For the cleanest slices, cut the cake while it’s still cold.
Can I leave out the orange zest and orange juice?
Absolutely! I like the subtle orange flavor because it complements the vanilla, cinnamon, and chocolate, but it’s definitely a personal preference.

Who would like a piece of this fabulous Cannoli Cake?
Quick video to see how easy this Cannoli Cake comes together… (cake is slightly more yellow in the video due to different brand of butter, eggs, etc.)
Hope you enjoy this Cannoli Cake recipe!
Want More Cannoli Recipes?
Be sure to check out all my other fun cannoli recipes!

Cannoli Cookies – One of my most popular recipes. These cake-like cookies always get rave reviews.
Best Cannoli Dip – Quick and easy and so fun for parties and potlucks!
Chocolate Cannoli Dip – Perfect for chocolate lovers. All the flavors of a cannoli plus extra chocolate.
Cannoli Milkshake – Fun treat for kids or adults. Add your favorite liqueur for a grown-up version.
Cannoli Dip (Orange Almond) – I added a little extra orange and almond to this version of cannoli dip.
Mini Cannoli Dip Cups – Love these cute little dessert cups. Great idea for parties and potlucks!
Cannoli Cream Chocolate Truffles – These cute little candies make the best holiday treats!
Cannoli Cheesecake Bars – Easy cheesecake bars with all the tastes of cannoli.
Mini Frozen Cannoli Cheesecake Bites – Cheesecake bars cut into bite-size pieces and dipped in chocolate.
Cannoli Poke Cake – an easy cake with cannoli topping.
If you like Italian desserts you may also like this colorful Spumoni Cake!

Cannoli Cake Recipe
Ingredients
Cake Batter:
- 2 1/2 cups all purpose flour
- 2 1/2 teaspoons baking powder
- 1/2 teaspoon salt
- 3/4 cup unsalted butter softened
- 1 3/4 cups granulated sugar
- 3 large eggs
- 1 tablespoon fresh orange zest
- 1 1/2 teaspoons vanilla extract
- 1 1/4 cup milk
Frosting: (see notes below)
- 10 ounces ricotta cheese drained overnight if needed (see notes below) Use ricotta impastata if you can find it.
- 16 ounces mascarpone cheese drained overnight if needed (see notes below)
- 3 cups powdered sugar (possibly more if needed)
- 1 teaspoon vanilla extract
- 1 teaspoon fresh orange juice
- 1/2 teaspoon ground cinnamon
- 1/4 teaspoon salt
- 10 ounces mini chocolate chips divided (if you want a lot of chocolate chips on the outside, you may want to have another bag on hand)
Instructions
- Preheat oven to 375 degrees F. Butter and flour 2 9-inch round baking pans (or can substitute 8-inch round baking pans).
- Mix together flour, baking powder, and salt in medium mixing bowl until well combined.
- Beat together butter and granulated sugar in large mixing bowl with an electric mixer on medium speed until light and fluffy. Beat in eggs one at a time. Then beat in fresh orange zest and 1 1/2 teaspoons vanilla extract until well combined.
- Alternate adding the dry ingredients and milk into the butter and sugar mixture, beating after each addition until just combined.
- Pour cake batter into prepared pans, spread to form even layers. Bake for about 20-25 minutes or until toothpick inserted into middle comes out clean. (If using 8 inch pans, baking time will be about 30-35 minutes.)
- Cool cakes slightly then remove from pans and finish cooling completely on wire racks. When cakes are completely cool, split each layer in half horizontally with a long serrated knife to form 4 layers.
- For frosting, beat together ricotta and mascarpone in a large mixing bowl with an electric mixer on medium speed until just combined. Beat in powdered sugar, 1 teaspoon vanilla, orange juice, cinnamon, and salt until just combined.
- To assemble cake, place one layer on cake dish. Top with frosting then sprinkle about 2-3 tablespoons of mini chocolate chips on top. Repeat with remaining layers. Frost outside of cake and add remaining chocolate chips to outside of cake or as desired. Use remaining frosting to decorate or pipe as desired. Refrigerate cake until ready to serve.
Notes
- You can omit the orange zest and juice if you don’t like citrus. Y
- ou can also add chopped pecans, walnuts, or pistachios with the chocolate chips.
- Instead of vanilla extract, you could use almond extract or Fiori di Sicilia.
Nutrition:
(Nutrition data is provided when available for informational purposes only and calculated using an online nutritional calculator. For the most accurate information please calculate based on specific ingredients and brands you use as well as any changes you made to the recipe. I am not a certified nutritionist or registered dietician and any nutritional information provided should only be used as a general guideline and estimate.)

About Lisa Huff
Lisa Huff is a Cookbook Author, Freelance Recipe Developer, Food Photographer, Blogger/Writer, and award-winning home chef. She loves creating unique recipes from healthy to decadent including cocktails, appetizers, main dishes, dessert recipes and more and has appeared on various shows, publications, and websites.













I added 15 ounce jar of ricotta cheese by mistake. Do you think it will still taste okay?
To the frosting? It may turn out a bit soupy but you could add more of the other ingredients if needed to hopefully thicken it up and just make a lot more frosting. The extra makes a good dip or cannoli filling. :)
Unfortunately I realized my mistake after putting frosting on the cake ????
I have used unflavored gelatin and that will help in keeping with the consistency without having to add too much powdered sugar.
Had a taste for cannoli cake. Thought I would give this recipe a try. It’s nice to do a trial run before you take a new recipe to an event. Turned out perfect! I read the reviews prior to making this. I used whole milk ricotta cheese. I cut back the powdered sugar to 2 1/2 cups. Also added cannoli chips to the top. Five stars and two thumbs up. ????
Wish I can add a picture to share how beautiful it turned out. Will definitely make again. Thank you!
I made it and it was pretty easy considering all the steps but I used regular cool whip for the additional frosting. Next time I make it I would omit the cinnamon in the cannoli . Other than that it was great and I had great compliments on it
I just made this cake & it was wonderful. I only used half the powdered sugar for the icing so it had much more of a true cannoli flavor.
Icing didn’t turn out at all. It was runny, I’m not sure what happened! I drained and squeezed the ricotta cheese per the directions. Do I have to use the ricotta cheese.
Did you use full fat ricotta and also use the mascarpone cheese too? That helps thicken it up. You can substitute more mascarpone (or cream cheese if you have to) for the ricotta.
Made this for my daughter’s 30 th birthday now for her Bridal Shower this weekend- it is delicious but will double frosting again????❤️
Happy 30th to your daughter and congrats on the wedding!
Made this for my daughter’s 13th birthday and it came out perfect. It was a big hit. I will definitely make this again.
Glad it worked out for you! Big happy birthday to your daughter!!
I made this cake yesterday your recipe was perfection, my daughters new favorite cake for her birthdays. The cake baked up perfect nice color, texture,and height. The cannoli filling was delicious and the perfect spreading consistency, the only thing I changed was the chips for shaved milk chocolate, my daughter does not like chocolate chips. The cannoli frosting was so beautiful I left off the chocolate and just put a chocolate drip on the rim of the cake. Anyone who complains they had a hard time with this recipe must not have followed your directions or has not baked long enough to know depending on your product you might have to alter a bit, my frosting was perfect at 2 1/2 cups powdered sugar. This recipe is a keeper thank you for sharing
Thank you so much Marcy! Appreciate your sweet review! :)
I did not have success with the frosting. It was WAY too runny. I drained the ricotta overnight and added a whole bag of powdered sugar to try and thicken it up but it still ran off the cake. The taste was on point but I couldn’t get the consistency right.
Sorry to hear that. Unfortunately, some brands and types of ricotta cheese are a lot thicker than others. You can try all mascarpone cheese which has a much thicker and smoother consistency.
Thanks, I’ll have to try that.
This recipe is such crap. It’s way too sweet to be a decent emulation of a cannoli but more importantly, you omitted a massively important step for the frosting-draining the ricotta, but put it in your word-vomit self-promotion that no one wants to read. So thank you so much for costing me about $20 in frosting ingredients that are now a useless blob. You suck.
Ummm says right in the recipe in the recipe card next to ricotta to drain….Sorry if you missed it! If you had questions I would have been happy to answer had you asked or emailed. Oh well!
Just used this recipe for my husband’s birthday… WOW! I added pulverized walnuts as a topping and filler, shaved milk chocolate. This recipe is on point and great directions, very much appreciated.
Happy birthday to your husband! So glad he enjoyed the cake!! Pulverized walnuts is a great idea!!
Made this cake for my birthday and it was a huge hit! Excellent. I did not drain the ricotta – wasn’t a huge issue but will do so next time. If I wanted to make cupcakes instead of cake how long would you suggest for baking time or any other tips you may have. Thank you!!
It should bake like regular cupcakes, so I would suggest baking for about 15-20 minutes.
I made this for a birthday and it was great! I made the cake the day before (frosted it too!) and froze the whole thing over night because I had to bring it with me to a house about 3 hours away. The cake and frosting held up well and it was delicious.
How tall is the finished cake? I need to be sure it will fit in my cake carrier. Thanks!
Ummm I haven’t measured it but it’s just slightly taller than a standard 2 layer cake. It should fit in most standard carriers but if you’re worried, you don’t have to cut the cake layers in half and just make as a standard 2 layer cake.
Happy to report about 3-1/2” – 4” tall. Looks great. Had a little issue with 2 of the layers cracking after I sliced the cakes, but I was able to get the two layers that cracked into the middle of the cake and fix it with frosting. I think they cracked because I had left them actually too long on my wire mesh cooling rack. They stuck to it a little – next time I’ll spray the rack with non stick. They were room temperature. Thanks for the recipe.
Great, thanks for reporting back! So glad it worked out!
I made this for my daughter’s 19th Birthday, everyone LOVED it, said it was the best cake I’ve ever made♡♡♡ Thanks for such a great recipe!
YAY! So happy to hear you loved it! A big happy birthday to your daughter!