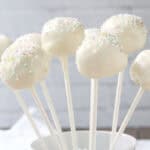
These Vanilla Cake Pops are soft, sweet, and coated in smooth white candy melts with colorful sprinkles for a fun, bakery-style treat. Made from scratch with vanilla cake and frosting, this homemade cake pop recipe is easily adaptable and perfect for parties, birthdays, and special occasions.

Vanilla Cake Pops are one of those desserts that instantly make people smile. They’re festive, bite-sized, and surprisingly satisfying, with moist cake on the inside and a crisp candy coating on the outside.

While cake pops look fancy, they’re totally doable at home with a little patience and chill time. They’re quite popular and expensive at many local bakeries and even Starbucks, but you can make them at home. This recipe walks you through each step so you end up with sturdy, adorable cake pops that taste just as good as they look.
They do sell cake pop molds now, which you can try, or make them the old-fashioned way with frosting on the inside, like this DIY tutorial and recipe.
What I Love About This Recipe
- I love how moist and flavorful the cake pops are on the inside. Mixing the cake with frosting creates that classic cake pop texture that’s soft without being crumbly. Every bite feels rich and balanced. It’s the perfect cake-to-frosting ratio.
- The white candy coating makes these cake pops feel clean, bright, and celebratory. It’s a great base for colorful sprinkles and works for almost any theme. Simple changes to the sprinkles can completely transform the look. That versatility makes this recipe incredibly useful.
- These are perfect for making ahead. Once the cake balls are chilled and dipped, they hold up well and travel nicely. That makes them ideal for parties, bake sales, or gifting. They’re as practical as they are cute.
- I also love how customizable this recipe is. You can change the cake flavor, coating color, or toppings easily. One base recipe opens the door to endless variations.
Equipment You May Need
- Round Cake Pans – Used to bake the vanilla cake base.
- Mixing Bowls – Medium and large bowls for cake, frosting, and mixing.
- Electric Hand Mixer – Makes creaming butter and sugar much easier.
- Wire Cooling Rack – Allows the cake to cool completely.
- Baking Sheet – Holds the cake balls while chilling.
- Wax Paper or Parchment Paper – Prevents sticking while chilling.
- Double Boiler – Used to melt the candy coating smoothly.
- Spatula – Helps mix cake and frosting evenly.
- Lollipop Sticks – Turn cake balls into cake pops.
- Cake Pop Stand or Foam – Keeps cake pops upright while they set.
Vanilla Cake Pops Ingredients
For the Cake
- All-Purpose Flour – Provides structure for the cake.
- Baking Powder and Baking Soda – Help the cake rise evenly.
- Salt – Balances sweetness.
- Unsalted Butter – Adds richness and flavor.
- Granulated Sugar – Sweetens the cake.
- Eggs – Provide structure and moisture.
- Vanilla Extract – Adds classic vanilla flavor.
- Milk – Keeps the cake tender.
For the Frosting
- Unsalted Butter – Forms the base of the frosting.
- Powdered Sugar – Sweetens and thickens the frosting.
- Milk – Helps achieve a smooth, spreadable texture.
For the Candy Coating
- White Candy Melts – Create a smooth coating that hardens nicely.
- Sprinkles – Add color, texture, and fun.
(Full printable recipe card is at bottom of post.)
How to Make Vanilla Cake Pops
Step One: Preheat the Oven
Preheat oven to 350°F and prepare a greased cake pan.
Step Two: Mix the Dry Ingredients
In a medium bowl, stir together the flour, baking powder, baking soda, and salt.
Step Three: Cream the Butter and Sugar
Beat the butter until smooth, then mix in sugar until light and fluffy. Beat in eggs and vanilla.
Step Four: Make the Batter
Alternate adding dry ingredients and milk, mixing just until combined.
Step Five: Bake the Cake
Pour batter into the pan and bake until a toothpick comes out clean. Cool completely.
Step Six: Make the Frosting
Beat butter, powdered sugar, and milk until smooth and thick.
Step Seven: Form the Cake Balls
Crumble cooled cake, mix with frosting, then roll into balls and chill until firm.
Step Eight: Dip the Cake Pops
Melt the candy coating, dip the sticks into the coating, insert them into cake balls, then dip fully and coat.
Step Nine: Decorate and Set
Add sprinkles before coating sets, then place upright to harden completely.

Serving Suggestions
- Serve at birthday parties, baby showers, weddings, holidays, or other celebrations. They make great party and wedding favors!
- Add to dessert tables or holiday spreads on a cake pop stand or on platters.
- Wrap individually for gifting in nice, clear food bags and ribbons.
- Or just serve with a cup of coffee for an afternoon snack or dessert. Add a little homemade vanilla creamer to your coffee for a great pair.
Quick Tips for Best Results
- Make sure the cake is completely cool before mixing with frosting.
- Chill cake balls well so they don’t fall apart when dipping.
- Work in batches when dipping to prevent candy melts from thickening.
- Change out the colors and sprinkles for any holiday, such as red and green for Christmas, rainbow sprinkles for summer, or red and pink for Valentine’s Day, or any other ideas you can come up with.
- You can use any sprinkles you like, including homemade sprinkles.

Vanilla Cake Pops FAQ
How should I store Cake Pops?
Store cake pops in an airtight container in the refrigerator for up to 5 days.
Can I freeze Cake Pops?
Yes, cake pops freeze well. Freeze fully set cake pops for up to 1 month and thaw in the refrigerator.
How long will Cake Pops last?
They’re best within 3 to 5 days when stored properly.
Substitutions?
You can swap sprinkles for chopped candy, mini chocolate chips, or crushed cookies.
Can I use low-fat ingredients?
Low-fat substitutions may affect texture. Full-fat ingredients work best for structure.
What else can I add to this recipe?
Try flavored extracts, colored candy melts, or themed sprinkles. You can add a little of your favorite extracts to the cake batter or frosting such as almond, lemon, etc.
Can I make this vegan/vegetarian/low carb/gluten-free?
Here are some suggestions, but I can’t guarantee results. Be sure as always to check particular brands and ingredients if you’re following a specific diet or have diet restrictions or allergies.
Vegan – Use a vegan cake, frosting, and dairy-free candy coating.
Vegetarian – It’s vegetarian. Be sure to check individual brands/products just to be sure though.
Low-Carb – You can try a sugar substitute.
Gluten-Free -Use a gluten-free cake recipe and candy melts labeled gluten-free.

Other Recipes on Sticks You May Enjoy
- Chocolate Pops – Easy homemade candy on a stick that you can change for any holiday or occasion.
- Chicken Stuffed Waffle Pops – A savory appetizer on a stick with chicken and waffles!
- Dipped Oreo Ice Cream Pops – Ice cream and Oreos!

Hope you enjoy this Vanilla Cake Pops recipe. Tell me in the comments what kind of sprinkles or decorations you used.
If you like cake, you may also like this Orange Pound Cake!
Vanilla Cake Pops
Ingredients
Cake:
- Butter for greasing the pan
- 1 cup all-purpose flour plus more for dusting the pan
- 1 teaspoon baking powder
- ¼ teaspoon baking soda
- ¼ teaspoon salt
- ⅓ cup unsalted butter softened
- ⅔ cup granulated sugar
- 2 large eggs
- 1½ teaspoons vanilla extract
- ⅓ cup milk
Frosting:
- ¼ cup unsalted butter softened
- 2 cups powdered sugar
- 2 to 4 tablespoons milk
Candy Coating:
Instructions
- Preheat the oven to 350˚F. Grease and lightly flour a 9-inch round cake pan.
- In a medium bowl, stir together the flour, baking powder, baking soda, and salt. Set aside.
- In a large bowl, beat ⅓ cup softened butter with an electric mixer on medium speed for about 10 seconds or until smooth. Beat in the granulated sugar until well combined and light and fluffy, about 2 minutes. Beat in the eggs, one at a time, beating after each egg is added. Beat in the vanilla.
- Alternate adding some of the flour mixture and ⅓ cup milk to the butter mixture, beating on low after each addition until the batter is just combined.
- Pour the cake batter into the prepared pan. Bake for 20 to 25 minutes, or until a toothpick inserted into the middle comes out clean. Cool slightly, then remove the cake from the pan to finish cooling on a wire rack.
- When the cake is completely cooled, prepare the frosting. In a medium bowl, add ¼ cup softened butter and beat with an electric mixer for about 10 seconds, or until smooth. Gradually beat in the powdered sugar. Add 2 tablespoons of milk and beat until smooth, adding a little more milk at a time as needed. Frosting should be a little on the thicker side.
- In a large bowl, crumble the cooled cake into pieces. Add ¼ cup of frosting. Using a sturdy spatula or large spoon, mix together the cake and frosting. Add a little more frosting at a time until the cake is fully crumbled and the mixture starts to clump together.
- Scoop the cake mixture out into 1-inch balls, roll in your hands if necessary to form a ball, and place on a baking sheet lined with wax or parchment paper. Refrigerate for about 1 hour, or until the cake balls are firm.
- Place the candy melts in the top of a double boiler. Place over boiling water, then reduce heat to low. Stir constantly, until the candy melts are melted and smooth. Dip about ¼ inch of the tip of a lollipop stick into the melted candy melt, then insert the stick into the cake ball. Dip the cake balls, one at a time, in the candy melts, covering the entire cake ball and just below to the stick. You can pour the melted candy melts into a tall narrow container or glass for easier dipping. Before candy melt hardens, sprinkle the sprinkles on top of the cake balls. Place the cake pops on a cake ball stand or in foam (see Pro Tip) to stand upright. Repeat with the remaining cake balls.
Notes
- Make sure the cake is completely cooled before mixing with the frosting; otherwise, the frosting will melt and the cake will not mold into balls.
- Instead of sprinkles, you can use your favorite chopped candy, mini chocolate chips, or chopped nuts.
Nutrition:
(Nutrition data is provided when available for informational purposes only and calculated using an online nutritional calculator. For the most accurate information please calculate based on specific ingredients and brands you use as well as any changes you made to the recipe. I am not a certified nutritionist or registered dietician and any nutritional information provided should only be used as a general guideline and estimate.)


About Lisa Huff
Lisa Huff is a Cookbook Author, Freelance Recipe Developer, Food Photographer, Blogger/Writer, and award-winning home chef. She loves creating unique recipes from healthy to decadent including cocktails, appetizers, main dishes, dessert recipes and more and has appeared on various shows, publications, and websites.